


Introduction
Have you ever woken up in the morning only to discover that your Minecraft server or website has been down for several hours? Instead of relying on paid solutions like Uptime Robot, you can host your own, beautiful, and 100% free monitoring system.
Uptime Kuma is a powerful open-source tool that can monitor websites, game servers, TCP ports, and DNS services. In this quick tutorial, we will show you how to install it on your own server using Docker in just 15 minutes!
Tip: Uptime Kuma does not consume many resources. The cheapest plan from our Budget VPS lineup (e.g., based on Ubuntu 22.04) will easily be enough for this task.
Step 1: Docker Compose Preparation
The entire Uptime Kuma application runs in a single Docker container. If you don't have Docker installed yet, use the official installation script:
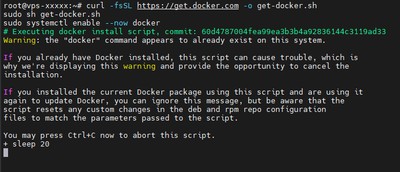
curl -fsSL https://get.docker.com -o get-docker.sh
sudo sh get-docker.sh
sudo systemctl enable --now docker
We recommend using the Docker Compose plugin (it is built-in in the latest versions, but let's make sure):
sudo apt-get install docker-compose-plugin
Check the version to ensure everything is working:
docker compose version
Step 2: Uptime Kuma Configuration and Startup
Now we will create a dedicated folder for our application and configure the YAML file with container settings.

mkdir -p ~/uptime-kuma
cd ~/uptime-kuma
Create a docker-compose.yml file using your favorite text editor, for example, nano:
nano docker-compose.yml
Paste the following content into it:
services:
  uptime-kuma:
    image: louislam/uptime-kuma:1
    container_name: uptime-kuma
    volumes:
      - ./uptime-kuma-data:/app/data
    ports:
      - "3001:3001"  # You can change the left value to another port if 3001 is taken
    restart: always
Save the file (Ctrl+O, Enter) and exit the editor (Ctrl+X).
Next, run the application in the background using the command:
sudo docker compose up -d
That's it! The application will download the image and start up. You can verify this by typing sudo docker ps.
Step 3: First Login and Adding a Monitor
To log into the panel, open your server's IP address in a browser, appending port 3001, e.g.:
http://YOUR_IP_ADDRESS:3001
Security: Remember that while Uptime Kuma forces you to create a password, connecting via HTTP is not the most secure. Be sure to check out our guide on How to Configure Nginx Proxy Manager to connect your domain to Uptime Kuma and generate a free SSL certificate!
Upon entering the site, you will create your administrator account (username and password).
Next, in the top left corner, click "Add New Monitor".
You have a multitude of options to choose from here, e.g.:
- HTTP(s): to check if a website (e.g., your blog) is working.
- TCP Port: to check if an SSH process (port 22) or network application is running.
- Steam Game Server: ideal for game servers (e.g., FiveM, Rust).
- Minecraft: a built-in feature that queries MC servers directly (you provide the IP address and game port).
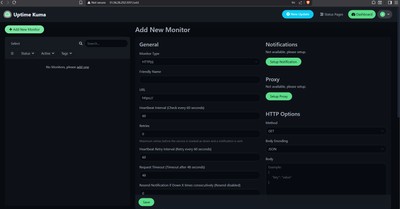
Fill out the form and click "Save". Your first monitor is now up and running!
Step 4: Configuring Notifications
Monitoring is useless if nobody knows about an outage. Uptime Kuma supports over 90(!) notification services, including Telegram, Discord, Slack, Email (SMTP), and even Microsoft Teams.
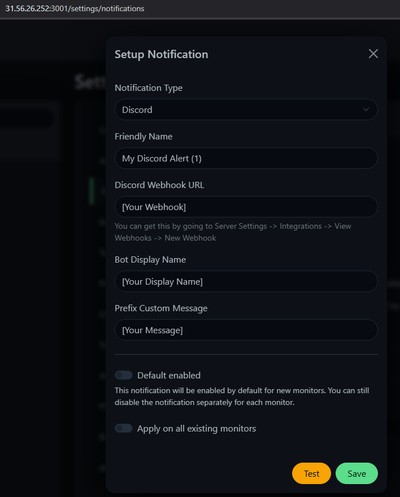
We will show you how to configure simple notifications on Discord:
- On your Discord server, go to a text channel's Settings -> Integrations -> Create Webhook. Copy its URL.
- In Uptime Kuma, go to the top menu and enter Settings -> Notifications.
- Click "Setup Notification".
- Select type: Discord.
- Paste the copied Webhook URL.
- Click Test to see if the bot sent a test message to your channel. If so, save it by clicking Save.
Now, when creating or editing any monitor (Step 3), make sure you have selected your newly created notification channel on the right side!
Conclusion
Setting up your own monitoring system is just a few minutes of work. Thanks to Uptime Kuma, you maintain full privacy of your logs and avoid paying subscription fees for premium services (like short, 1-minute check intervals, which can be very expensive in SaaS solutions).
Uptime Kuma installed on a stable VoxiHost Budget VPS is a guarantee that you will know about the failure of your main projects before your clients or players notice it!