

Introduction
When you host multiple applications on a single VPS (like WordPress, Nextcloud, and a game panel), you quickly run into a problem: they can't all listen on the default web ports (80 and 443). You end up accessing them via awkward port numbers like http://your-ip:8080.
To map real domain names (cloud.yourdomain.com) to these apps and secure them with HTTPS, you need a Reverse Proxy. Nginx Proxy Manager (NPM) is the easiest, most visually appealing way to do this.
Prerequisites: Before you start, you need a VPS running Ubuntu or Debian with SSH access, a user with
sudoprivileges, and Docker with Docker Compose installed. If you need help with Docker Compose, see our Docker Compose setup guide.
Step 1: What is Nginx Proxy Manager?
Nginx Proxy Manager is a web-based interface that controls Nginx. Instead of writing complex Nginx configuration files by hand, you get a beautiful dashboard where you can route traffic, assign domain names to specific Docker containers, and generate free Let's Encrypt SSL certificates with just a few clicks.
Step 2: Deploying NPM
Because NPM is containerized, deploying it takes seconds if you have Docker and Docker Compose installed.
Create a new directory for NPM:

mkdir ~/npm-server
cd ~/npm-server
Create your docker-compose.yml file:
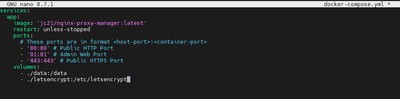
nano docker-compose.yml
Paste the official recommended stack:
services:
  app:
    image: 'jc21/nginx-proxy-manager:latest'
    restart: unless-stopped
    ports:
      # These ports are in format <host-port>:<container-port>
      - '80:80' # Public HTTP Port
      - '81:81' # Admin Web Port
      - '443:443' # Public HTTPS Port
    volumes:
      - ./data:/data
      - ./letsencrypt:/etc/letsencrypt
Save and exit. Notice how NPM takes over ports 80 and 443 for your entire VPS. It will intercept all incoming web traffic and seamlessly route it to the correct internal container!
Spin up the manager:
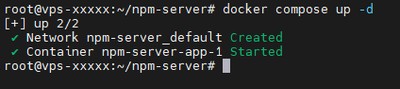
docker compose up -d
Step 3: Accessing the Panel
Once the containers are running, you can access the admin panel by visiting your server's IP address on port 81.
http://your_server_ip:81
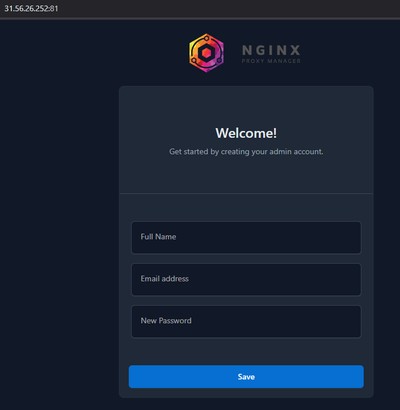
Default Login Credentials:
- Email:
admin@example.com - Password:
changeme
Immediately upon logging in, NPM will prompt you to change these default credentials. Do so to secure your proxy!
You can now click "Proxy Hosts" -> "Add Proxy Host" to seamlessly connect any domain name to any port running on your VPS, and click the SSL tab to generate a free certificate instantly. Say goodbye to manual Nginx configs!
Conclusion
You now have Nginx Proxy Manager running on your VPS and fully accessible through its web dashboard. You can route any number of services to clean domain names and issue free Let's Encrypt SSL certificates in just a few clicks, with no manual Nginx configuration required.
Pair NPM with other self-hosted services running on the same VPS, such as WordPress or Nextcloud, to build a complete, production-ready self-hosted stack.
If you need a reliable server for your self-hosted stack, check out our Premium VPS plans or Budget VPS options, which both feature fast NVMe SSD storage and a high-bandwidth network port.