


Introduction
Exposing an Nginx web server to the public internet invites a constant stream of automated probes. Bots hunt for vulnerabilities, attempt credential stuffing, and flood your logs with malformed requests. If you are running your services on a VPS, you need a proactive defense mechanism that works without constant manual intervention.
Fail2Ban is the industry standard for this task. It monitors your server logs in real-time, identifies suspicious patterns-such as repeated 404 errors or failed login attempts-and automatically updates your firewall to block offending IP addresses. While Nginx handles your traffic, Fail2Ban acts as your automated gatekeeper.
This guide focuses on a clean, maintainable installation on Ubuntu. We avoid the common trap of editing default configuration files directly, which ensures your security rules survive system updates. By the end of this tutorial, you will have a hardened Nginx environment configured to use the systemd backend for optimal performance and minimal resource overhead. We assume you have a base Ubuntu installation with root or sudo access. If you are starting from scratch, ensure your system is patched and your firewall is enabled before proceeding.
Prerequisites
Before beginning, ensure your VPS server meets the following requirements. Running these services requires a minimum of 1GB RAM and 1 CPU core to maintain stable performance during log parsing operations.
- Access to a terminal with
sudoprivileges on an Ubuntu 24.04 LTS or newer distribution. - An active firewall, such as UFW, to manage network traffic effectively. If you have not yet set up your firewall, check out our guide: How to Configure UFW Firewall on Ubuntu & Debian: The Complete Server Guide.
- Nginx installed and running. If you need to perform a fresh install, refer to How to Install Nginx on Ubuntu & Debian: The Complete Server Guide.
- Basic familiarity with text editors like
nanoorvimfor modifying configuration files.
Verify that your system clock is synchronized using NTP, as Fail2Ban relies on accurate timestamps to calculate the duration of bans. You can check this by running timedatectl status. Finally, ensure that your Nginx access logs are enabled and accessible, as Fail2Ban will need read permissions to monitor incoming traffic for malicious activity.
Step 1: Install Nginx and Fail2Ban
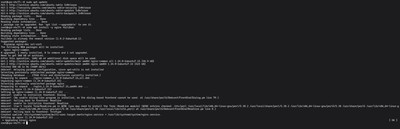
To begin, we need to ensure your package list is up to date and install the necessary software components. Using the official Ubuntu repositories ensures that you receive security updates and maintain compatibility with your system architecture.
Execute the following commands to update your package index and install both Nginx and Fail2Ban:
## Update package list and install Nginx and Fail2Ban
sudo apt update
sudo apt install -y nginx fail2ban
Once the installation finishes, Fail2Ban creates a default configuration file located at /etc/fail2ban/jail.conf. Modifying this file directly is discouraged because package updates can overwrite your changes. Instead, we create a local copy that takes precedence.
## Create the local configuration file to preserve settings
sudo cp /etc/fail2ban/jail.conf /etc/fail2ban/jail.local
Modern Ubuntu distributions utilize systemd to manage logs. For optimal performance and to reduce the latency between a malicious event and a ban, we must configure Fail2Ban to use the systemd backend rather than the default log file polling method. Run this command to update your configuration:
## Set the Fail2Ban backend to systemd
sudo sed -i 's/backend = auto/backend = systemd/g' /etc/fail2ban/jail.local
With these settings applied, your environment is ready for specific Nginx protection rules. In the next steps, we will define the jails that monitor your web traffic.
Step 2: Configure the Fail2Ban Jail
Now that the backend is set, we need to create a specific jail configuration for Nginx. A jail defines which log files to monitor and what actions to take when a threshold is met. By default, Fail2Ban does not actively monitor Nginx unless you explicitly enable the corresponding jail in your jail.local file.
To define your custom Nginx protection, open the local configuration file in your preferred text editor:
## Open the local configuration file
sudo nano /etc/fail2ban/jail.local
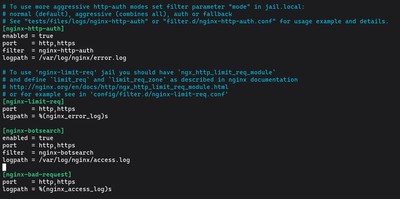
Scroll through the file until you find the [nginx-http-auth] or [nginx-botsearch] sections. You can enable these by changing the enabled parameter from false to true. For a robust setup, ensure the following lines are present and uncommented within your file:
[nginx-http-auth]
enabled = true
port    = http,https
filter  = nginx-http-auth
logpath = /var/log/nginx/error.log

[nginx-botsearch]
enabled = true
port    = http,https
filter  = nginx-botsearch
logpath = /var/log/nginx/access.log
The nginx-http-auth jail protects your site against brute-force attacks on pages secured with Basic Auth, while nginx-botsearch blocks malicious scanners attempting to find hidden administrative directories. After adding these blocks, save the file by pressing Ctrl + O, followed by Enter, and exit with Ctrl + X.
Note: If you are running a VPS with a high volume of traffic, ensure your log paths match your actual Nginx configuration. If you have customized your log directory, update the
logpathvalue accordingly to prevent the service from failing to start.
Step 3: Enable the Nginx Jails
With the jail.local configuration updated, the final step is to apply these changes. Fail2Ban must be instructed to reload its configuration so that the new Nginx jails are initialized and the monitoring service starts tracking your log files for suspicious activity.
Because we have modified the core configuration, we need to restart the service to commit these changes to memory. Execute the following commands to enable the service, restart it, and verify that it is running correctly:
## Enable, restart, and verify the status of the Fail2Ban service
sudo systemctl enable fail2ban
sudo systemctl restart fail2ban
sudo systemctl status fail2ban
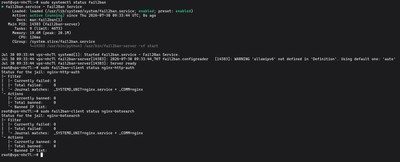
The status output should indicate that the service is active (running). You can also verify that your specific Nginx jails are active by using the fail2ban-client utility. This tool interacts directly with the running daemon and confirms that the jails are successfully parsing your log files:
## Verify that the nginx-http-auth and nginx-botsearch jails are active
sudo fail2ban-client status nginx-http-auth
sudo fail2ban-client status nginx-botsearch
If the status returns "Currently failed: 0" and "Total failed: 0," your setup is ready. The service is now actively scanning your /var/log/nginx/ files for patterns matching the default filters. If you notice any issues with log parsing, ensure that the permissions on your Nginx log files allow the Fail2Ban user to read them. For most standard installations on a VoxiHost VPS, the default permissions are sufficient.
Step 4: Verify Fail2Ban Functionality
Now that the service is running and the jails are initialized, you need to confirm that Fail2Ban is actually watching your logs and ready to block malicious traffic. The most reliable way to test this is by checking the jail status and simulating a failed login attempt.
First, verify that Fail2Ban is actively monitoring the Nginx log files by checking the jail summary:
## Display the list of currently active jails
sudo fail2ban-client status
You should see nginx-http-auth and nginx-botsearch listed under the "Jail list" section. If they appear there, the daemon has successfully linked the filters to your Nginx logs.
To test if the filter is working, intentionally trigger a failed authentication request against your server. If you have an Nginx location block protected by Basic Auth, attempt to log in with the wrong credentials multiple times. If you do not have a protected page, you can simulate a bot attack by requesting a non-existent file that triggers the nginx-botsearch filter.
After triggering the failure, check the jail status again to see if the counter has incremented:
## Check the status of a specific jail to see failed attempts
sudo fail2ban-client status nginx-http-auth
If the "Currently failed" count reflects your attempts, Fail2Ban is parsing your logs correctly. Once your predefined threshold (the maxretry setting in jail.local) is reached, Fail2Ban will automatically insert a rule into your firewall to drop incoming traffic from that IP. You can confirm the ban by inspecting the logs:
## Tail the Fail2Ban log to see real-time ban actions
sudo tail -f /var/log/fail2ban.log
You should see entries indicating that an IP has been banned.
Conclusion
Securing your web server with Fail2Ban provides a critical layer of defense against automated attacks. By monitoring your Nginx logs in real-time and dynamically updating your firewall, you effectively neutralize brute-force attempts and malicious bot traffic before they can impact your system resources.
On a VoxiHost VPS, this proactive security approach ensures that your services remain performant and available for legitimate users. Remember that security is not a one-time configuration. Periodically review your jail.local settings and monitor your logs to ensure your filters remain effective against evolving threats.
If you decide to modify your security policies, always remember to check the syntax of your configuration files before restarting the service:
## Validate your configuration syntax for errors
sudo fail2ban-client -t
Should you need to apply updates to your security configuration, stop the service first to ensure a clean state, apply your changes, and then reload:
## Safely stop and reload Fail2Ban after configuration changes
sudo systemctl stop fail2ban
sudo systemctl start fail2ban
With Fail2Ban operational, you have significantly reduced the attack surface of your Linux environment. For further hardening, consider pairing this with a properly configured UFW firewall, as detailed in our guide on how to Configure UFW Firewall on Ubuntu & Debian: The Complete Server Guide. Staying vigilant and keeping your software updated remains the best way to maintain a secure and reliable server infrastructure.