



Introduction
Managing Python dependencies on a production server often leads to conflicts. When you install packages globally using pip, you risk breaking system-level tools that rely on specific library versions. On modern Ubuntu distributions, this issue is further addressed by PEP 668, which restricts global package installations to ensure system stability.
The industry-standard solution is the virtual environment, or venv. By isolating your project dependencies into a local directory, you ensure that your application has exactly what it needs without interfering with the underlying operating system or other projects hosted on your VoxiHost Premium VPS.
This guide provides a direct, no-nonsense approach to setting up isolated Python environments. We will walk through installing the necessary module, creating a clean workspace, and activating your environment to start installing packages safely. Whether you are running a lightweight microservice on a Budget VPS or managing complex data pipelines, this setup is the foundation of professional Python development on Linux.
Prerequisites
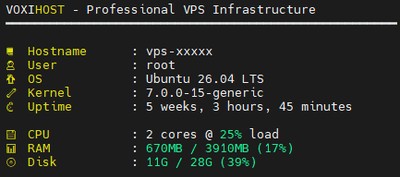
Before beginning, ensure your server meets the minimum requirements for a stable development environment. We recommend a minimum of 512MB of RAM and 1 CPU core, which is standard for our Budget VPS and Premium VPS instances.
You should have access to an Ubuntu 22.04 LTS or newer server with a non-root user that has sudo privileges. If you have not yet set up your administrative user, refer to our guide on How to Create a Sudo User on Ubuntu & Debian: The Complete Server Guide to ensure you are not running development tasks as the root user.
Additionally, confirm that your system clock is synchronized to avoid SSL errors when fetching packages. You should also ensure that your APT package list is current to avoid dependency resolution issues. While no specific Python code is required at this stage, having basic familiarity with the command line is expected.
Finally, check that you have enough disk space available in your project directory to accommodate the virtual environment structure, which typically consumes a few megabytes for the core files plus the size of any project-specific dependencies you intend to install later.
Step 1: Install the Python Venv Module
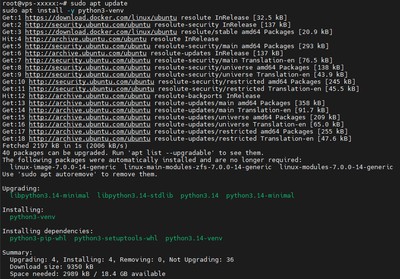
Modern versions of Ubuntu include Python by default, but the module required for creating isolated environments is often excluded from the core installation to save space. To manage your project dependencies without polluting the global system packages, you must install the python3-venv package. This ensures you comply with PEP 668, which restricts global pip installations on newer Ubuntu releases to prevent conflicts with system-level software.
Execute the following commands to update your local package index and pull the necessary module into your system:
## Update the package index and install the virtual environment module
sudo apt update
sudo apt install -y python3-venv
This installation provides the venv module, which allows you to create lightweight, isolated Python environments. Once the process finishes, verify the installation by checking the Python version. While this doesn't explicitly confirm the module's presence, it ensures your environment is ready for the next steps:
## Verify Python installation
python3 --version
If you are using a VoxiHost Premium VPS, this operation will complete in seconds. You are now prepared to initialize your first virtual environment within a dedicated project directory.
Step 2: Create a Project Directory
Before you initialize your environment, you need a clean workspace to host your application code and its dependencies. Keeping your projects in separate directories prevents file clutter and makes it easier to manage multiple environments on your VoxiHost server.
Navigate to your home directory or a dedicated folder for your development projects, then create a new directory for your specific task:
## Create a new project directory and move into it
mkdir -p ~/my_python_project
cd ~/my_python_project

Step 3: Create and Activate the Virtual Environment
With the project directory ready, you can now initialize the virtual environment. We will use the venv module to generate a local directory named venv. This folder will contain a standalone Python binary and its own pip installer, effectively sandboxing your project from the rest of the operating system.
## Initialize the virtual environment in the current folder
python3 -m venv venv
After running this command, you will notice a new venv directory in your current path. This directory holds everything needed to run your project without requiring root privileges. Do not use sudo for this step or any subsequent package management within this environment, as it can cause ownership issues that break your project configuration. Next, activate the environment to start using the local binaries:
## Activate the virtual environment
source venv/bin/activate
Once activated, you will notice that your terminal prompt changes to include (venv) at the beginning. This visual indicator confirms that any subsequent commands, such as python or pip, are now pointing to the binaries located inside your project folder rather than the system defaults.
Note: If you find that
pipis not available after activation, you can ensure it is installed by runningpython3 -m ensurepip --upgrade. This will safely install the package manager directly into your virtual environment without affecting your host system.
At this point, your VoxiHost server is correctly configured for local development. You can now safely install project-specific libraries using pip install <package_name>. Because you are using a virtual environment, these packages will remain contained within your ~/my_python_project/venv directory, keeping your system clean and avoiding conflicts with other applications.

Step 4: Manage Packages Within the Environment
Now that your environment is active, you can manage project dependencies without requiring root access. The primary tool for this is pip, the standard package installer for Python. Because your shell is currently pointed at the isolated venv binaries, any library you install will be saved exclusively to your project folder.
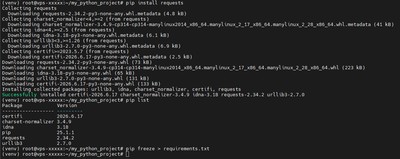
To install a package, such as requests, simply run:
## Install a package within the virtual environment
pip install requests
You can verify that the library is installed correctly by listing the currently available packages in your environment:
## List all installed packages in the current venv
pip list
If you are working on a collaborative project or moving your code to a production VoxiHost server, you should generate a requirements file. This allows you to track exactly which versions of libraries your project needs:
## Export the current environment dependencies to a file
pip freeze > requirements.txt
This requirements.txt file is the industry standard for maintaining consistent environments across different machines. If you ever need to recreate this environment on another server, you can install all dependencies at once using pip install -r requirements.txt.
Warning: Never use
sudowhen runningpipinside your virtual environment. Usingsudocan cause file permission errors and may inadvertently install packages to the system-wide Python directory, which violates the isolation you have just established.
Conclusion
You have successfully established a robust, isolated Python environment on your system. By moving away from global package management, you have eliminated the risk of dependency conflicts and ensured that your projects remain portable and stable. This workflow is particularly vital when deploying applications on your Premium VPS or Budget VPS, where maintaining a clean system state is essential for long-term server health.
Remember that virtual environments are ephemeral. If you ever need to update your dependencies, simply reactivate the environment using the source venv/bin/activate command and run your updates. If you find your project requirements have changed significantly, it is often cleaner to delete the venv directory and recreate it from your requirements.txt file rather than manually uninstalling dozens of individual packages.
As your projects grow, you might consider containerizing them with Docker or implementing automated deployment scripts to handle these environment setups. For now, you have a solid foundation for local development and production deployment. Keep your server secure, keep your dependencies pinned, and continue building on your infrastructure with confidence.