

When you deploy a new server, whether it's a cloud VPS or a bare-metal machine, the hosting provider usually hands you the root credentials. The root account has absolute power over the system, no restrictions, no confirmation prompts, no safety net. One wrong command and you can wipe the entire disk.
Logging in directly as root is widely considered a bad security practice. Instead, you should create a regular user account, give it administrative privileges (via sudo), and use that account for your day-to-day work.
On Ubuntu and Debian, creating a new sudo user takes about two minutes.
Step 1: Log in as root
First, connect to your server via SSH as the root user:
ssh root@your-server-ip
Step 2: Add the new user
Use the adduser command to create the new account. Replace yourusername with whatever name you want to use (don't use spaces or uppercase letters):
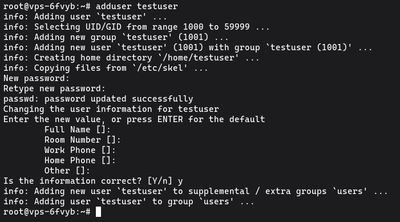
adduser yourusername
You'll be prompted to set and confirm a new password. Make it strong, if your server has SSH password authentication enabled, bots will eventually try to guess it.
Adding user `yourusername' ...
Adding new group `yourusername' (1001) ...
Adding new user `yourusername' (1001) with group `yourusername' ...
Creating home directory `/home/yourusername' ...
Copying files from `/etc/skel' ...
New password:
Retype new password:
passwd: password updated successfully
After the password, you'll be asked for some user information (Full Name, Room Number, etc.). This is a relic from the early days of Unix. You don't need to fill any of it out, just press ENTER to skip through all of them, and press Y when asked if the information is correct.
Step 3: Grant sudo privileges
By default, new users on Ubuntu and Debian are standard, unprivileged accounts. They can't install software or edit system configurations.
To grant administrative powers, you need to add the user to the sudo group. Members of this group are automatically allowed to run any command with root privileges by typing sudo before it.
Run this command (again, replace yourusername):

usermod -aG sudo yourusername
The -aG flags are important. -a means "append" and -G means "groups". If you forget the -a, the user will be removed from all their other groups and added only to the sudo group, which breaks things.
Step 4: Test the new sudo user
Before you log out of your root session, make sure the new user works. Use the su (switch user) command to instantly switch to the new account:

su - yourusername
Your command prompt will change from root@server to yourusername@server. Now, verify that your sudo privileges work by running a command that requires root access, like checking the root directory or testing the whoami command:
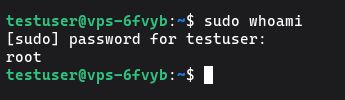
sudo whoami
The very first time you use sudo on a new account, you'll see a standard lecture about respecting others' privacy and thinking before you type. It will then ask for your password (the one you set in Step 1, not the root password).
If the output says root, success! Your user has administrative privileges.
Next Steps
Now that you have a safer way to administer your server, you can close your SSH session and log back in directly as the new user:
ssh yourusername@your-server-ip
For a truly secure server, your next move should be setting up SSH key authentication for this new user and disabling root login entirely.
If you're looking for a clean, fast environment to host your projects, deploy a Budget VPS, create your user, and start building.