
Introduction
WordPress powers over 40% of the web. While you can install it manually using a LAMP or LEMP stack, using Docker Compose is widely considered the modern, superior approach. It isolates your WordPress site and its database into neat containers, making backups, migrations, and updates incredibly simple.
In this tutorial, we will deploy the official WordPress Docker image alongside a dedicated MySQL database.
Prerequisites: Before you start, you need a Linux VPS with SSH access, a user account with
sudoprivileges, and Docker with Docker Compose already installed. See our Docker Compose setup guide if needed.
Step 1: Prepare the Environment
Make sure you have Docker and Docker Compose installed on your VPS.
First, let's create a dedicated directory for your new website. This folder will hold your configuration file and all persistent website data (like uploaded images and plugins).

mkdir ~/my-wordpress-site
cd ~/my-wordpress-site
Step 2: Create the Configuration
In Docker Compose, your entire server architecture is defined in a single file.
nano docker-compose.yml
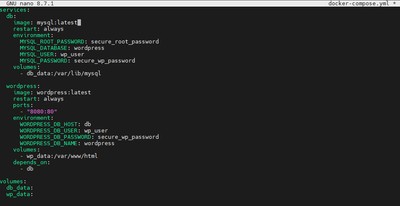
Paste the following YAML configuration:
services:
  db:
    image: mysql:latest
    restart: always
    environment:
      MYSQL_ROOT_PASSWORD: secure_root_password
      MYSQL_DATABASE: wordpress
      MYSQL_USER: wp_user
      MYSQL_PASSWORD: secure_wp_password
    volumes:
      - db_data:/var/lib/mysql

  wordpress:
    image: wordpress:latest
    restart: always
    ports:
      - "8080:80"
    environment:
      WORDPRESS_DB_HOST: db
      WORDPRESS_DB_USER: wp_user
      WORDPRESS_DB_PASSWORD: secure_wp_password
      WORDPRESS_DB_NAME: wordpress
    volumes:
      - wp_data:/var/www/html
    depends_on:
      - db

volumes:
  db_data:
  wp_data:
What this file does:
- db service: Pulls the official MySQL Latest image, sets up the database credentials, and mounts a persistent volume
db_dataso your database survives container restarts. - wordpress service: Pulls the latest WordPress image, maps the internal port 80 to your VPS's public port
8080, and connects to the database using the credentials we just defined. It also mountswp_dataso your themes and plugins are saved to your hard drive.
Important: Replace secure_root_password and secure_wp_password with real, strong passwords.
Save and exit.
Step 3: Launch and Install
To bring your website online, simply run:
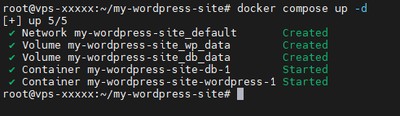
docker compose up -d
Docker will download WordPress and MySQL, link them via an internal network, and start them in the background.
Once the command finishes, open your web browser and navigate to your server's IP address on port 8080:
http://your_server_ip:8080
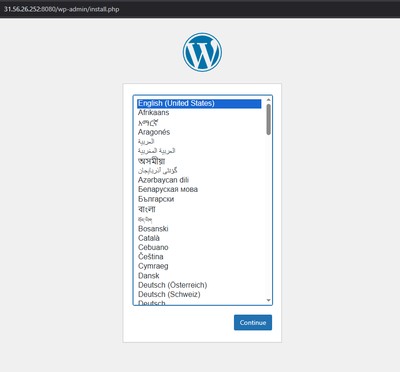
You will be greeted by the famous 5-minute WordPress installation screen. Select your language, set your site title, and create your admin account.
Conclusion
Your WordPress site is now live and running inside Docker containers on your VPS. The entire stack, consisting of WordPress and MySQL, is defined in a single docker-compose.yml file. This makes it easy to back up, migrate, or replicate to another server at any time.
As a next step, we strongly recommend placing your site behind Nginx Proxy Manager to assign a custom domain name and enable free HTTPS via Let's Encrypt. See our guide on how to set up Nginx Proxy Manager for the complete walkthrough.
If you need a reliable VPS to host your WordPress site, check out our Premium VPS plans or Budget VPS options, which both come with fast NVMe SSD storage and one-click deployment.