


Introduction
Running a high-performance web server requires a stack that balances speed with resource efficiency. While Apache has served the web for decades, Nginx combined with PHP-FPM has become the standard for modern, high-traffic applications. By offloading PHP processing to a dedicated FastCGI Process Manager, you gain significant improvements in memory consumption and request handling compared to older execution methods.
This guide focuses on setting up a stable, production-ready environment on Ubuntu 26.04 LTS. We will walk through the installation of Nginx and the default PHP 8.5 version (PHP-FPM) available on your system, ensuring they communicate correctly via Unix sockets. This configuration is ideal for developers hosting dynamic sites on a VoxiHost Premium VPS, where every millisecond of latency reduction matters.
We prioritize a clean, minimal installation. We avoid bloated bundles in favor of package-managed, official repositories that ensure security updates are just an apt upgrade away. By the end of this tutorial, you will have a functional web server capable of serving dynamic PHP content, complete with the configuration tweaks required to avoid common bottlenecks. Whether you are migrating an existing application or spinning up a fresh project, this setup provides a rock-solid foundation for your infrastructure.
Prerequisites
Before beginning the installation, ensure your server meets the baseline requirements for a stable production environment. We recommend a minimum of 1GB of RAM and at least one dedicated CPU core to handle the overhead of Nginx and the PHP-FPM worker processes without performance degradation. This guide assumes you are running a fresh installation of Ubuntu 26.04 LTS.
You must have root access or a user account with sudo privileges to execute administrative commands. If you are using a VoxiHost Budget VPS, ensure your firewall is correctly configured to allow incoming traffic on ports 80 and 443. If you have not yet set up your firewall, follow our guide on securing-ubuntu-server-with-ufw to prevent unauthorized access to your management ports.
Verify that your package list is current and that your system is fully updated to avoid dependency conflicts during the installation process. Although we will install specific packages in the following steps, having a clean, updated environment prevents common library mismatch errors. Ensure you are logged into your server via SSH and have your domain or server IP address ready for testing the final configuration.
Step 1: Install Nginx and PHP-FPM
To begin the setup, you must fetch the latest package metadata from the official repositories and install the Nginx web server alongside the PHP-FPM interpreter. We will install the default php-fpm package, which automatically resolves to PHP 8.5 on Ubuntu 26.04 LTS (or PHP 8.3 if you are running Ubuntu 24.04 LTS).
Run the following commands to initialize the installation:
## Update the local package index to ensure you pull the latest versions
sudo apt update

## Install Nginx and the default PHP FastCGI Process Manager
sudo apt install nginx php-fpm
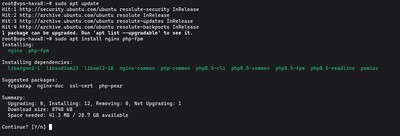
Once the installation is complete, you should check which PHP version was installed as the default on your system. This determines the exact service and socket names you will use in subsequent steps. Run:
## Check the installed PHP version
php -v
For example, if the output shows PHP 8.5.x, your PHP-FPM service name is php8.5-fpm and the socket file is php8.5-fpm.sock (if you are on Ubuntu 24.04 LTS, it will show PHP 8.3.x with php8.3-fpm and php8.3-fpm.sock). Note this version — you will use it in the Nginx configuration in the next step.
Step 2: Configure the Nginx Server Block
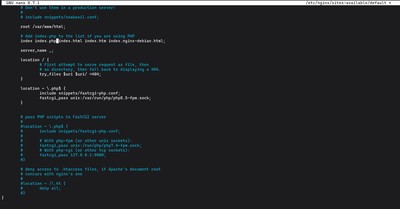
By default, Nginx is not configured to process PHP files. You must modify the default server block to pass requests for .php files to the PHP-FPM socket. Open the configuration file using the text editor:
## Open the default site configuration file for editing
sudo nano /etc/nginx/sites-available/default
Locate the location / block and ensure the index directive includes index.php. Then, uncomment or add the location ~ \.php$ { ... } block to handle PHP requests. Your configuration should resemble the following structure:
server {
    listen 80 default_server;
    listen [::]:80 default_server;

    root /var/www/html;
    index index.php index.html index.htm index.nginx-debian.html;

    server_name _;

    location / {
        try_files $uri $uri/ =404;
    }

    # Pass PHP scripts to the PHP-FPM socket
    location ~ \.php$ {
        include snippets/fastcgi-php.conf;
        fastcgi_pass unix:/var/run/php/php8.x-fpm.sock;
    }
}
Check the fastcgi_pass directive carefully. The path /var/run/php/php8.x-fpm.sock (where 8.x is your PHP version, e.g., 8.5 on Ubuntu 26.04 LTS or 8.3 on Ubuntu 24.04 LTS) must match the actual socket file on your system. If you encounter errors later, verify that the version number in the path aligns with the php8.x-fpm service you verified in the previous step. Save your changes by pressing Ctrl + O, then Enter, and exit with Ctrl + X.
Step 3: Create a PHP Test Script and Verify Setup
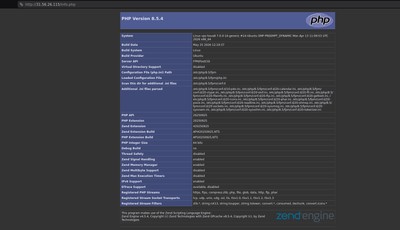
To verify that Nginx is correctly passing requests to the PHP-FPM processor, create a simple information page. This script uses the phpinfo() function, which displays the current PHP configuration, loaded modules, and environment variables.
Navigate to the default web root directory and create a new file named info.php:
## Create the test file in the default web root
sudo nano /var/www/html/info.php
Insert the following PHP code into the file:
<?php
phpinfo();
?>
Save the file by pressing Ctrl + O, then Enter, and exit using Ctrl + X.
Before testing the file in your browser, validate your Nginx configuration to ensure there are no syntax errors from the previous step. Then, apply the changes by reloading the service:
## Test the configuration syntax
sudo nginx -t

## Apply the changes to the Nginx service
sudo systemctl reload nginx
If the syntax test returns successful, open your web browser and navigate to http://your_server_ip/info.php. You should see a page detailing your PHP installation (which will show PHP 8.5 on a fresh Ubuntu 26.04 setup). If you see the raw code instead of the rendered page, double-check that the location ~ \.php$ block in your Nginx configuration matches the socket path exactly. Once you have confirmed that everything is working correctly, delete the test file to prevent unauthorized users from viewing sensitive server information:
## Remove the test script for security
sudo rm /var/www/html/info.php
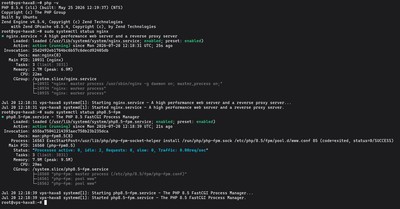
After verifying the PHP integration through the browser, perform a final status check on the services to ensure both Nginx and PHP-FPM are operating without errors. Run:
## Check the status of the Nginx web server
sudo systemctl status nginx

## Check the status of the PHP-FPM service (replace 8.x with your version)
sudo systemctl status php8.x-fpm
Verify that both services display an "active (running)" status. If a service shows as "failed" or "inactive," check the system logs using journalctl -u nginx or journalctl -u php8.x-fpm (replacing 8.x with your installed PHP version). Periodically checking the Nginx error logs at /var/log/nginx/error.log is also highly recommended to proactively catch file permission issues or missing PHP modules before they affect your users.
Conclusion
You now have a fully functional LEMP stack running on your Ubuntu server. By pairing Nginx with PHP-FPM 8.5, you have established a high-performance foundation capable of handling dynamic web traffic with minimal overhead. Whether you are deploying a custom application or a content management system, this configuration provides the necessary control over your server environment.
Maintaining this stack involves more than just the initial setup. As your application grows, you may need to adjust the worker processes in your Nginx configuration or tune the PHP-FPM pool settings to better suit your resource allocation. If you ever need to perform a system update, remember to stop the services first to ensure data integrity:
## Safely stop services before system updates (replace 8.x with your version)
sudo systemctl stop nginx
sudo systemctl stop php8.x-fpm

## Run your system package updates
sudo apt update && sudo apt upgrade -y

## Restart the services after the update (replace 8.x with your version)
sudo systemctl start nginx
sudo systemctl start php8.x-fpm
For those managing critical workloads, monitoring is the next logical step. Keep an eye on system resource usage through your VoxiHost dashboard, especially if you are scaling your Premium VPS or Budget VPS environments. Regularly checking your logs and keeping your packages current will ensure that your web server remains both fast and secure against emerging vulnerabilities.
If you decide to expand your infrastructure further, consider looking into How to Set Up SSL with Let's Encrypt & Certbot on Ubuntu & Debian: The Complete Guide to encrypt your traffic and improve your search engine rankings.