

TeamSpeak 3 remains one of the most reliable, low-latency, and resource-efficient voice communication platforms for gamers and communities. Self-hosting your own TeamSpeak server gives you ultimate privacy, full control over permissions, and zero reliance on third-party voice chat providers.
In this guide, you will learn how to properly install and secure a TeamSpeak 3 server on your Ubuntu or Debian VPS.
Prerequisites: Before starting, ensure you have a VPS running Ubuntu or Debian with SSH access and a user account with
sudoprivileges.
Step 1: Update the System
First, ensure your package index is updated and install the necessary utilities (wget for downloading and bzip2 for extracting the archive):
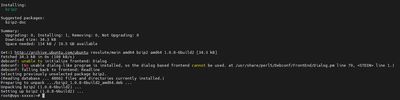
sudo apt update && sudo apt upgrade -y
sudo apt install wget bzip2 -y
Step 2: Create a Dedicated User
Running any public-facing service as the root user is a major security risk. Let's create a dedicated system user specifically for TeamSpeak:

sudo adduser --disabled-password --gecos "" teamspeak
Now, switch to this new user to perform the installation:
sudo su - teamspeak
Step 3: Download and Extract TeamSpeak 3
Fetch the latest TeamSpeak 3 server files. You can always find the newest version on the official TeamSpeak downloads page.

wget https://files.teamspeak-services.com/releases/server/3.13.8/teamspeak3-server_linux_amd64-3.13.8.tar.bz2
Extract the downloaded archive and move the files into the home directory for cleaner organization:
tar xvf teamspeak3-server_linux_amd64-3.13.8.tar.bz2
mv teamspeak3-server_linux_amd64/* .
rm -rf teamspeak3-server_linux_amd64 teamspeak3-server_linux_amd64-3.13.8.tar.bz2
Step 4: Accept the License Agreement
TeamSpeak requires you to accept their End User License Agreement (EULA) before the server will start. You can do this by creating an empty file named .ts3server_license_accepted:

touch .ts3server_license_accepted
Step 5: First Run and Privilege Key
Now, start the server manually for the first time. This step is critical because the server will display your ServerAdmin privilege key, which you need to claim admin rights in your TeamSpeak client.
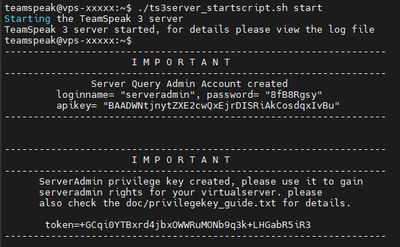
./ts3server_startscript.sh start
You will see output containing your Privilege Key and ServerQuery Admin Credentials. Copy these details and save them somewhere safe!
Once you have saved the key, stop the server so we can configure it to run as a background service:
./ts3server_startscript.sh stop
Step 6: Configure a Systemd Service
To ensure your TeamSpeak server starts automatically if your VPS reboots, we need to create a systemd service. First, exit back to your sudo user:
exit
Create a new service file:
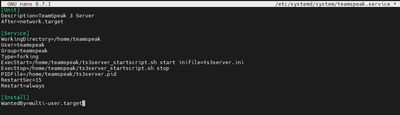
sudo nano /etc/systemd/system/teamspeak.service
Paste the following configuration:
[Unit]
Description=TeamSpeak 3 Server
After=network.target

[Service]
WorkingDirectory=/home/teamspeak
User=teamspeak
Group=teamspeak
Type=forking
ExecStart=/home/teamspeak/ts3server_startscript.sh start inifile=ts3server.ini
ExecStop=/home/teamspeak/ts3server_startscript.sh stop
PIDFile=/home/teamspeak/ts3server.pid
RestartSec=15
Restart=always

[Install]
WantedBy=multi-user.target
Save and exit (CTRL + O, ENTER, CTRL + X).
Reload systemd and start your new service:

sudo systemctl daemon-reload
sudo systemctl enable teamspeak
sudo systemctl start teamspeak
Check the status to verify it is running perfectly:
sudo systemctl status teamspeak
Conclusion
Congratulations! You have successfully installed and configured a TeamSpeak 3 server.
To connect, open your TeamSpeak 3 Client, connect to your server's IP address, and paste the Privilege Key you saved in Step 5 when prompted. You will instantly be granted Server Admin status.
Next Steps
- If you have a firewall enabled, ensure you open the correct ports. Check out our guide on how to configure UFW. TeamSpeak requires ports
9987/udp(Voice),10011/tcp(ServerQuery), and30033/tcp(File Transfer). - Looking for a cost-effective hosting option? Try our Budget VPS options, or get ultimate reliability for large communities on a VoxiHost Premium VPS backed by VoxiShield DDoS Protection.