

Minecraft 1.17.x specifically requires Java 16. This guide covers the complete 1.17 lifecycle. For a broader overview of Java requirements, visit our Minecraft Java Server Compatibility Guide.
Safety first: Running public game servers as the
rootuser exposes your entire system to unnecessary risk. Follow Step 2 carefully to setup a secure environment.
Supported Versions
This Java 16 guide is fully compatible with:
- 1.17 Era: 1.17.1, 1.17
To find the exact link for your version, visit our Minecraft Vanilla Server Download Links Archive.
Prerequisites
- A VPS running Ubuntu or Debian (Available on Premium VPS).
- Root or sudo access via SSH (for installing Java).
- A restricted non-root user to run the server software safely.
Step 1: Install Java 16
Before proceeding, we recommend updating your system to ensure stability.
Troubleshooting: Java 16 is a legacy version and may not be found in the repositories of newer versions (like Ubuntu 24.04+). If you get an "Unable to locate package" error, install Java 17 instead, it is fully compatible with Minecraft 1.17.1.
Option A: Install Java 16 (If available)
sudo apt update
sudo apt install openjdk-16-jre-headless -y

Option B: Install Java 17 (Fallback)
sudo apt update
sudo apt install openjdk-17-jre-headless -y
Step 2: Create a Dedicated User
For security, never run your server as root. If you are new to Linux permissions, check our guide on How to Create and Manage Users on Ubuntu/Debian.
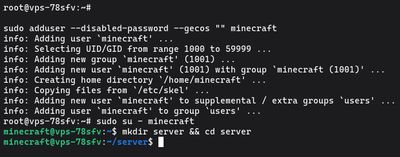
sudo adduser --disabled-password --gecos "" minecraft
sudo su - minecraft
mkdir server && cd server
Step 3: Download 1.17.1
Looking for a different version? You can find direct Mojang download links for all releases in our Minecraft Server Download Archive.

wget https://piston-data.mojang.com/v1/objects/a16d67e5807f57fc4e550299cf20226194497dc2/server.jar
Step 4: Accept the EULA

Run the server once to generate the required configuration files:
java -jar server.jar nogui
sed -i 's/eula=false/eula=true/' eula.txt
Step 5: Create Launch Script
Pro Tip: Using the Nano Editor
Nano is a beginner-friendly text editor for the terminal. If thenanocommand is not found, install it usingsudo apt install nano -y.
- To Save: Press
CTRL + O, then hitENTER.- To Exit: Press
CTRL + X.
Paste the following (Aikar's Flags optimized for G1GC):

nano start.sh
In the editor, paste:
#!/bin/bash
java -Xmx4G -Xms4G -XX:+UseG1GC -XX:+ParallelRefProcEnabled -XX:MaxGCPauseMillis=200 -XX:+UnlockExperimentalVMOptions -XX:+DisableExplicitGC -XX:+AlwaysPreTouch -XX:G1NewSizePercent=30 -XX:G1MaxNewSizePercent=40 -XX:G1HeapRegionSize=8M -XX:G1ReservePercent=20 -XX:G1HeapWastePercent=5 -XX:G1MixedGCCountTarget=4 -XX:InitiatingHeapOccupancyPercent=15 -XX:G1MixedGCLiveThresholdPercent=90 -XX:G1RSetUpdatingPauseTimePercent=5 -XX:SurvivorRatio=32 -XX:+PerfDisableSharedMem -XX:MaxTenuringThreshold=1 -Dusing.aikars.flags=https://mcflags.emc.gs -Daikar.for.v1.20=false -jar server.jar nogui

Make it executable:
chmod +x start.sh
Step 6: First Launch & Administrator Setup
Before setting up the automatic background service, you should run the server manually at least once to grant yourself administrator (OP) rights.
1. Start the server manually

Run the launch script you just created:
./start.sh
2. Grant Administrator (OP) rights

Once the server has finished loading (you see the "Done!" message), type your command directly into the console:
op your_minecraft_username
3. Stop the server
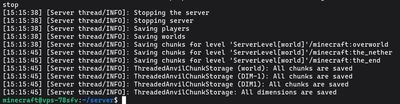
To save the world data and prepare for background hosting, type:
stop
This will return you to the normal Linux command line.
Step 7: Configure Systemd Service
For a professional setup, we use systemd. This ensures your server starts automatically if the VPS reboots and handles crashes gracefully.
Exit the minecraft user back to your root/sudo account:
exit

Create the service file:
sudo nano /etc/systemd/system/minecraft.service
Paste the following configuration:
[Unit]
Description=VoxiHost Minecraft 1.17 Server
After=network.target

[Service]
User=minecraft
WorkingDirectory=/home/minecraft/server
ExecStart=/home/minecraft/server/start.sh
Restart=on-failure
RestartSec=10

[Install]
WantedBy=multi-user.target

Enable and start your server:
sudo systemctl daemon-reload
sudo systemctl enable minecraft
sudo systemctl start minecraft
Managing Your Server
- Check Status:
sudo systemctl status minecraft - View Logs:
sudo journalctl -u minecraft -f - Stop Server:
sudo systemctl stop minecraft
Next Steps: Security & Management
Now that your server is running, don't forget to:
- DDoS Protection: All VoxiHost servers include automatic VoxiShield protection. Your server is already being monitored to prevent downtime during attacks.
- Open the Firewall: Allow traffic on port
25565by running:sudo ufw allow 25565/tcp. For more details, see our UFW Setup Guide. - Transfer Files: Want to upload an existing world? Use SFTP as explained in our FileZilla Tutorial.
- Hardening & Monitoring: Protect your VPS further by securing SSH and setting up Fail2ban. You can also monitor your system resources using htop.
Looking for a stable home for your world? Check out Premium VPS.