WireGuard is a modern, revolutionary VPN protocol that has completely dominated the privacy landscape. It is significantly faster, more secure, and connects almost instantaneously without heavily draining cell phone batteries compared to older standards like OpenVPN.
While you can manually configure IP tables and NAT forwarding rules to install it, you shouldn't. It is extremely error-prone for beginners.
Instead, the global open-source community relies on a highly audited, universally trusted bash script by developer Angristan to seamlessly configure WireGuard on any VPS securely in less than two minutes.
Here is how to deploy your own private VPN on any Linux VPS to bypass restrictions and browse securely.
Step 1: Download the Trusted Install Script
Log into your server via SSH. Make sure you update your system before executing the installation:
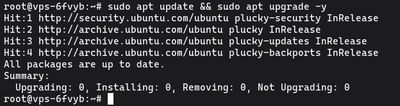
sudo apt update && sudo apt upgrade -y
Now, download the official installation script directly from Angristan's GitHub repository:

curl -O https://raw.githubusercontent.com/angristan/wireguard-install/master/wireguard-install.sh
Step 2: Run the Auto-Installer
Before you can run the file, you must tell Linux that this text file is actually an executable script:

sudo chmod +x wireguard-install.sh
Now, execute the script with root privileges:
sudo ./wireguard-install.sh
Step 3: The Configuration Prompts
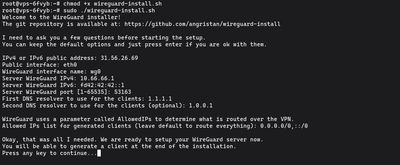
The brilliant thing about this script is that it automatically detects your server's network interfaces, public IP addresses, and DNS configurations.
When you run the script, it will ask you to confirm several settings. For 99% of deployments, you should simply press Enter to accept the default values for every single prompt.
The prompts will look roughly like this:
IPv4 or IPv6 public address: (Auto-filled with your IP)
Public interface: (Auto-filled, usually eth0 or enp3s0)
WireGuard port: [51820]
First DNS resolver to use for the clients: [1.1.1.1]
Press Enter through all of them. The script will then rapidly download the wireguard packages via apt, configure all the complex IP forwarding traffic rules in the Linux kernel, set up the firewall routing, and generate the master server encryption keys.
Step 4: Generate Your First Client Key
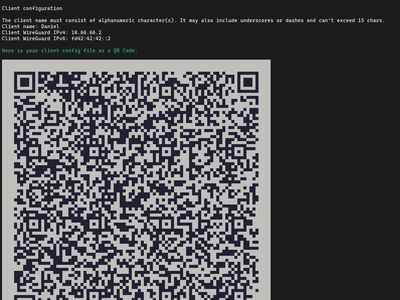
WireGuard uses highly secure peer-to-peer cryptography. To connect your phone or laptop to the VPN, you need to generate a client configuration file (.conf) for each device.
Immediately after installing the server packages, the script will automatically prompt you to create your first client:
Client name:
Type a recognizable name without spaces, like daniel_iphone or my_macbook, and press Enter.
Client's DNS server: [1]
Press Enter to accept the default DNS (usually Cloudflare or Google).
The script does something incredibly helpful here. Not only does it create the .conf file in your root folder, but it also renders a massive QR code directly in your terminal window using ASCII characters!
Step 5: Connect Your Devices
Connecting a Mobile Phone (iOS/Android):
Connecting your mobile phone is absurdly simple.
- Go to the App Store or Google Play Store.
- Download the official, free WireGuard app.
- Open the app and tap the
+icon to add a new tunnel. - Select "Create from QR code".
- Point your phone's camera at the giant QR code currently sitting on your computer terminal screen.
Name your connection, flip the toggle switch to "On", and you are immediately encrypting all your mobile traffic through your VPS!
Connecting a Laptop or PC (Windows/Mac/Linux):
Laptops cannot scan terminal QR codes easily. Instead, you need to retrieve the actual .conf file the script generated.
If you named your client my_macbook, the script saved a file named my_macbook.conf in the directory where you ran the script (usually /home/youruser/ or /root/).
- Download the
my_macbook.conffile to your personal computer. (The easiest way to do this securely is using an SFTP client like FileZilla or WinSCP). - Download the official WireGuard application for Windows or Mac Desktop from their website.
- Click "Import tunnel(s) from file" and select
.conffile. - Click "Activate". Your traffic is now secured!
Generating More Clients
If you want to add a second laptop, a smart TV, or grant secure connection access to a team member, you do not need to reinstall WireGuard.
Simply run the script again:
sudo ./wireguard-install.sh
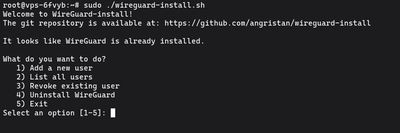
Because WireGuard is already installed, the script transforms cleanly into a management menu.
Press 1 to instantly generate another .conf file and QR code.
If you want a safe playground to test your WireGuard configuration, Budget VPS plans from VoxiHost are a perfect starting point. You can deploy a fresh instance in seconds and start building your private network right away.