In the modern web, serving your website over plain HTTP is no longer acceptable. Browsers will aggressively warn users that your site is "Not Secure," search engines like Google will heavily penalize your SEO rankings, and any submitted forms (like passwords or credit cards) will be transmitted in plain text for anyone to intercept.
You need an SSL/TLS certificate to enable HTTPS. Years ago, this was an expensive and deeply frustrating process. Today, thanks to the non-profit Let's Encrypt project and their automated client called Certbot, you can get enterprise-grade, cryptographically secure certificates completely for free in about two minutes.
Prerequisites
Before you begin, you must have two things in place:
- A web server with a configured domain block: You must have either Nginx or Apache installed, and a Server Block (Nginx) or Virtual Host (Apache) officially configured for your domain name. If you haven't done this, check out our Nginx installation guide or Apache installation guide.
- Proper DNS settings: Your domain (e.g.,
your_domain.comandwww.your_domain.com) must haveArecords actively pointing to your server's public IP address. Certbot will fail if the domain doesn't resolve to your server.
Step 1: Install Certbot
Certbot is the tool that reaches out to the Let's Encrypt servers, proves you own the domain, downloads the certificates, and injects them directly into your web server's configuration files.
First, update your package index:
sudo apt update
Next, you need to install Certbot along with its plugin for your specific web server.
If you are using Nginx:

sudo apt install certbot python3-certbot-nginx -y
If you are using Apache:
sudo apt install certbot python3-certbot-apache -y
Step 2: Confirm Firewall Settings
Certbot needs to communicate over HTTP (Port 80) to validate your domain, and your secure website will be served over HTTPS (Port 443).
If you followed our UFW Firewall guide, you need to ensure the firewall is allowing this traffic.
For Nginx:
sudo ufw status
If you only see Nginx HTTP allowed, you need to upgrade to Nginx Full:
sudo ufw allow 'Nginx Full'
sudo ufw delete allow 'Nginx HTTP'
For Apache:
If you only see Apache allowed in your sudo ufw status, upgrade the profile:
sudo ufw allow 'Apache Full'
sudo ufw delete allow 'Apache'
Step 3: Obtain and Install the SSL Certificate
This is where the magic happens. By using the web server plugins you installed in Step 1, Certbot will handle the entire validation, downloading, and configuration process automatically.
Run Certbot for Nginx:
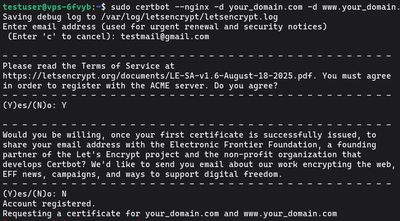
sudo certbot --nginx -d your_domain.com -d www.your_domain.com
Run Certbot for Apache:
sudo certbot --apache -d your_domain.com -d www.your_domain.com
The Certbot Prompts
When you run the command for the first time, Certbot will ask you a series of questions:
- Email Address: You must provide a valid email address. Let's Encrypt uses this strictly to notify you of impending expirations (if auto-renewal fails) or major security events.
- Terms of Service: Type
Yto agree to the Let's Encrypt TOS. - EFF Mailing List: Type
YorNbased on whether you want promotional emails from the Electronic Frontier Foundation (the creators of Certbot).
Certbot will then communicate with the Let's Encrypt API and run a challenge to verify you actually control the domain.
If it succeeds, it will automatically edit your Nginx .conf or Apache Virtual Host file to enable HTTPS. Modern versions of Certbot will automatically configure your server to aggressively redirect all unencrypted HTTP traffic entirely to the secure HTTPS connection.
When it finishes, navigate to https://your_domain.com in your browser to verify the padlock icon appears!
Step 4: Verify Auto-Renewal
Let's Encrypt certificates are absolutely free, but to minimize the impact of stolen or abandoned certificates, they only last for 90 days.
Thankfully, you never have to repeat Step 3. The certbot package on Ubuntu and Debian installs a systemd timer (a background background scheduled task) that runs twice a day. It checks for any certificates expiring in the next 30 days and smoothly auto-renews them in the background without dropping web traffic.
You can verify the timer is active by running:
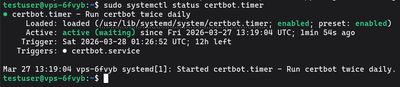
sudo systemctl status certbot.timer
You should see "Active: active (waiting)".
To test the renewal process and ensure there are no configuration errors blocking it, you can run a dry run:
sudo certbot renew --dry-run
If the dry run finishes without any errors, you are successfully set up! Your server is now continuously and permanently secured.
Need a blistering-fast environment ready to deploy secure web apps? Pick up an exceptionally affordable Budget VPS, setup your Nginx block, slap a free SSL on it, and launch your project safely to the world.