
fail2ban watches your auth logs and bans IP addresses that rack up too many failed login attempts. It's one of those tools that runs quietly in the background and only makes itself known when you check the ban list and realize it's blocked hundreds of addresses that were hammering your SSH port.
It's not a silver bullet, if you've already set up SSH key auth with passwords disabled, brute-force attacks against SSH are already useless. But fail2ban covers everything else: web services, mail servers, any application that logs authentication failures. And for servers where password auth is still in use for some services, it's a practical first line of defense.
fail2ban is often not installed by default on fresh Linux images, though premium providers like VoxiHost pre-install it on their templates with a sensible baseline configuration. If you need to install it from scratch or tune it for your specific setup, this guide covers that too.
Installing fail2ban
If it's not already installed:
sudo apt update
sudo apt install fail2ban -y
Once installed, the service starts automatically. Verify:

sudo systemctl status fail2ban
Configuring fail2ban jails
fail2ban works through "jails", each jail monitors a specific log file for a specific failure pattern, and bans IPs that exceed the threshold.
Never edit /etc/fail2ban/jail.conf directly. That file gets overwritten on updates. Instead, create a local override:
sudo cp /etc/fail2ban/jail.conf /etc/fail2ban/jail.local
Now edit jail.local:
sudo nano /etc/fail2ban/jail.local
Global defaults
At the top of the file, set global defaults that apply to all jails:
[DEFAULT]
# IP whitelist, never ban these
ignoreip = 127.0.0.1/8 ::1 YOUR.HOME.IP.ADDRESS

# Ban duration in seconds (3600 = 1 hour, -1 = permanent)
bantime = 3600

# Time window to count failures in
findtime = 600

# How many failures before a ban
maxretry = 5

# Use systemd journal backend (better on modern Ubuntu/Debian)
backend = systemd
Add your home or office IP to ignoreip, you don't want to lock yourself out after mistyping your password a few times.
SSH jail
Scroll down to find the [sshd] section, or add it:
[sshd]
enabled = true
port = ssh
# If you changed the SSH port, put the new port here:
# port = 2222
filter = sshd
logpath = %(sshd_log)s
maxretry = 3
bantime = 86400
A shorter maxretry and longer bantime than the global defaults are reasonable for SSH, three failed attempts in the window bans for a full day.
Integrating with ufw
By default, fail2ban uses iptables to ban IPs. If you're running ufw, tell fail2ban to use it instead for consistency:
In jail.local under [DEFAULT]:
banaction = ufw
This inserts ufw deny rules for banned IPs, which plays nicely with your existing firewall config.
Enabling and verifying fail2ban
Reload fail2ban to apply your config changes:
sudo systemctl restart fail2ban
Check the status of the SSH jail specifically:
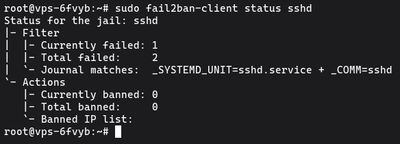
sudo fail2ban-client status sshd
You'll see something like:
Status for the jail: sshd
|- Filter
|  |- Currently failed: 2
|  |- Total failed: 47
|  `- File list: /var/log/auth.log
`- Actions
   |- Currently banned: 3
   |- Total banned: 12
   `- Banned IP list: 203.0.113.1 198.51.100.5 ...
That "currently banned" and "total banned" count are your proof it's working.
Unbanning an IP
If you accidentally ban yourself or a legitimate user:
sudo fail2ban-client set sshd unbanip 203.0.113.1
Replace the IP with the one you need to unban. Changes take effect immediately, no restart required.
Checking the fail2ban log
See what fail2ban has been doing:
sudo tail -f /var/log/fail2ban.log
You'll see entries for each ban and unban action in real time. On a public-facing server, the log fills up quickly. If you see thousands of attempts from the same subnet, that's a hint to ban the whole subnet range manually through ufw rather than letting fail2ban handle individual IPs.
Protecting Nginx and Apache
fail2ban ships with filters for common web services. To add Nginx protection:
[nginx-http-auth]
enabled = true
filter = nginx-http-auth
port = http,https
logpath = /var/log/nginx/error.log
maxretry = 5

[nginx-limit-req]
enabled = true
filter = nginx-limit-req
port = http,https
logpath = /var/log/nginx/error.log
maxretry = 10
For Apache:
[apache-auth]
enabled = true
filter = apache-auth
port = http,https
logpath = /var/log/apache2/error.log
maxretry = 5
After adding jails, restart fail2ban:
sudo systemctl restart fail2ban
sudo fail2ban-client status
The last command shows all active jails and their ban counts.
If you want a clean VPS to test fail2ban on before rolling it out to production, our Budget VPS plans are cheap enough to run through the whole setup without risk.