
fail2ban monitors authentication logs and automatically bans IP addresses that accumulate too many failed login attempts. On a server with a public IP, it quietly blocks hundreds of automated scanners that would otherwise churn through your ports looking for weak credentials.
For servers running AlmaLinux, CentOS Stream, Rocky Linux, or Fedora, the setup is almost identical to any other Linux system. The one meaningful difference is the firewall backend: these distros use firewalld, and fail2ban needs to know that so it inserts bans through firewalld rather than attempting raw iptables commands that might conflict.
While premium providers like VoxiHost pre-install fail2ban on their templates with a working baseline configuration, most default Linux images do not. This guide walks through installing and tuning it for your specific needs.
Installing fail2ban
On RHEL-based systems, fail2ban is available from EPEL (Extra Packages for Enterprise Linux). If it's not already installed:
sudo dnf install epel-release -y
sudo dnf install fail2ban -y
On Fedora, it's in the main repos:
sudo dnf install fail2ban -y
Enable and start it:

sudo systemctl enable --now fail2ban
Configuring fail2ban jails
fail2ban's behavior is controlled by "jails", each one watches a specific log for failure patterns and bans offending IPs.
Don't edit /etc/fail2ban/jail.conf directly. Package updates overwrite it. Create a local override instead:
sudo cp /etc/fail2ban/jail.conf /etc/fail2ban/jail.local
sudo nano /etc/fail2ban/jail.local
Global defaults
[DEFAULT]
# Never ban these IPs
ignoreip = 127.0.0.1/8 ::1 YOUR.HOME.IP.ADDRESS

# Ban duration in seconds (86400 = 24 hours, -1 = permanent)
bantime = 3600

# Window to count failures in
findtime = 600

# Failures before ban
maxretry = 5

# Use systemd journal (correct backend for these distros)
backend = systemd
Add your home IP to ignoreip, saves you from a frustrating self-lockout.
firewalld integration
This is the critical difference from Debian-based systems. fail2ban defaults to iptables, which conflicts with firewalld. Set the correct backend:
[DEFAULT]
# Use firewalld for banning (required on RHEL/Fedora)
banaction = firewallcmd-ipset
banaction_allports = firewallcmd-allports
Without this, fail2ban may appear to work but won't actually be blocking anything, or will create iptables rules that firewalld ignores.
SSH jail
Find or add the [sshd] section:
[sshd]
enabled = true
port = ssh
# If you changed the SSH port:
# port = 2222
filter = sshd
logpath = %(sshd_log)s
maxretry = 3
bantime = 86400
Three strikes and you're out for 24 hours is a reasonable policy for SSH.
Enabling and verifying fail2ban
Apply the configuration:
sudo systemctl restart fail2ban
Check the SSH jail status:
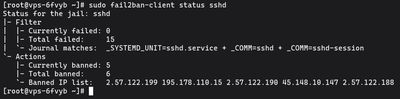
sudo fail2ban-client status sshd
Expected output:
Status for the jail: sshd
|- Filter
|  |- Currently failed: 1
|  |- Total failed: 34
|  `- Journal matches: _SYSTEMD_UNIT=sshd.service
`- Actions
   |- Currently banned: 2
   |- Total banned: 8
   `- Banned IP list: 203.0.113.45 198.51.100.12
If Currently banned is non-zero, something already tried and failed against your SSH. Good, it's working.
Verify that firewalld is actually enforcing the bans:
sudo firewall-cmd --list-rich-rules | grep fail2ban
You should see fail2ban-sshd rules listed. If that command returns nothing, the banaction wasn't set correctly, go back and check jail.local.
Unbanning an IP
To remove a specific ban immediately:
sudo fail2ban-client set sshd unbanip 203.0.113.45
No restart needed. The firewalld rule is removed on the spot.
Checking the logs
Watch what fail2ban is doing in real time:
sudo tail -f /var/log/fail2ban.log
On a public server you'll see this fill up quickly. Ban events, unban events, and occasionally errors if something is misconfigured. If you stopped seeing bans but know SSH is still getting hammered, check whether fail2ban is still running:

sudo systemctl status fail2ban
Protecting web services
fail2ban ships with filters for Nginx and Apache. Add jails for them:
[nginx-http-auth]
enabled = true
filter = nginx-http-auth
port = http,https
logpath = /var/log/nginx/error.log
maxretry = 5

[nginx-limit-req]
enabled = true
filter = nginx-limit-req
port = http,https
logpath = /var/log/nginx/error.log
maxretry = 10
Restart after adding jails:
sudo systemctl restart fail2ban
sudo fail2ban-client status
The status command shows all active jails. Each one you've enabled should appear with its own counter.
SELinux note
On systems where SELinux is enforced (which is the default), fail2ban generally works without issues because it interacts with firewalld at a higher level. If you see permission denials in /var/log/audit/audit.log related to fail2ban, check:
sudo ausearch -m avc -ts recent | grep fail2ban
Most common issues are solved by installing the fail2ban package through the official repos (which includes correct SELinux contexts) rather than manual installation.
If you want a clean RHEL-based server to test this setup on, our Budget VPS plans let you spin up, configure, and experiment without touching anything important.