Port 22 is scanned constantly. The moment you spin up a VPS with a public IP, automated bots start hammering it for weak passwords and default credentials. Hardening SSH takes about 15 minutes and makes your server dramatically less interesting to anyone trying to get in.
Prerequisite: This guide disables root login. You must have a non-root user with
sudoprivileges ready before running any of these steps. If you haven't done that yet, follow our How to Create a Sudo User on Ubuntu & Debian guide first, then come back here.
Set up SSH key authentication
The single most effective change you can make. Password logins can be brute-forced. Key-based auth cannot, not in any realistic timeframe.
On your local machine, generate a key pair:
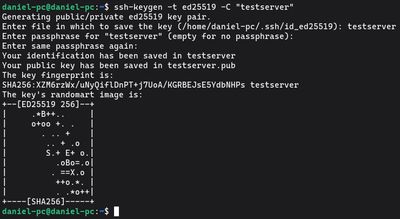
ssh-keygen -t ed25519 -C "your-server-label"
Use ed25519, it's faster and more secure than the older RSA algorithm. When prompted for a passphrase, set one. It encrypts the private key on disk, so even if someone compromises your laptop, they still can't use the key without it.
Copy the public key to the server. Replace youruser with your actual sudo username:

ssh-copy-id -i ~/.ssh/id_ed25519.pub youruser@your-server-ip
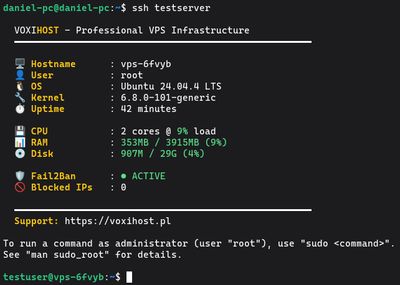
Test the key works before moving on. Open a new terminal window and connect. If you get in without a password prompt, the key is installed correctly. Do not close your existing session yet, you still need to disable password auth as a separate step.
Optional: add an entry to ~/.ssh/config on your local machine for quick access:

Host myserver
    HostName your-server-ip
    User youruser
    IdentityFile ~/.ssh/id_ed25519
After this, ssh myserver is all you need to type.
Disable root login
SSH in as your sudo user from this point forward. Direct root login is a security risk, if your session is compromised, an attacker has full unrestricted access with zero additional steps.
Open the SSH daemon config:
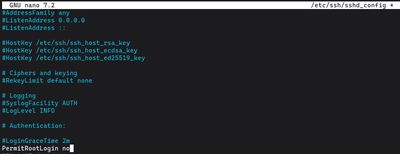
sudo nano /etc/ssh/sshd_config
Find and update this line:
PermitRootLogin no
If you ever need root access on the server, SSH in as your sudo user and run sudo su from there.
Disable password authentication
Your key is working, so now eliminate password logins entirely:
sudo nano /etc/ssh/sshd_config
Set both of these:
PasswordAuthentication no
PubkeyAuthentication yes
Important: Some Ubuntu and Debian versions set
PasswordAuthenticationin a drop-in file under/etc/ssh/sshd_config.d/that overrides the main config. Check for it:grep -r "PasswordAuthentication" /etc/ssh/If you see it set to
yesanywhere in the output, edit that specific file, not the mainsshd_config.
Tighten a few more settings
While you have sshd_config open, add these to reduce the attack surface further:
# Disconnect after 3 failed attempts
MaxAuthTries 3

# Close unauthenticated connections faster
LoginGraceTime 30

# Disable unused features
X11Forwarding no
AllowTcpForwarding no
If only specific usernames should be able to log in remotely, add an allowlist:
AllowUsers youruser
Any account not on the list will be refused at the SSH level, even with a valid key.
Change the default port
Port 22 appears in every scanner's default target list. Moving SSH to a non-standard port won't stop a determined attacker from port-scanning, but it eliminates virtually all the automated noise. Auth logs go from hundreds of failed login attempts per day to effectively zero.
In sshd_config, update the port:
Port 2222
Choose any unused port above 1024. Before restarting SSH, update your firewall to allow the new port and close the old one:
sudo ufw allow 2222/tcp
sudo ufw deny 22/tcp
sudo ufw status
Make sure 2222 shows as ALLOW in the output before proceeding.
Restart SSH and verify
Apply all your changes:
sudo systemctl restart ssh
Then, in a new terminal window (keep your current session open), test the connection on the new port:
ssh -p 2222 youruser@your-server-ip
If it connects cleanly, you're done. If it fails, return to your existing session and debug. Run sudo sshd -t to check sshd_config for syntax errors before restarting again.
Common issues:
- Firewall not updated for the new port
PasswordAuthentication noset in a drop-in file that was missed
Check what the server is actually seeing
After locking things down, inspect live authentication attempts:
sudo journalctl -u ssh --since "1 hour ago" | grep "Failed"
On a properly hardened server you should see nothing, or just a handful of attempts on the old port being silently dropped by the firewall.
A note on fail2ban
With SSH key auth enabled and password auth disabled, brute-force attacks against SSH are already impossible. fail2ban becomes less critical for SSH itself. That said, it's still useful for protecting other services like Nginx and Apache, and running it alongside these settings adds a reasonable layer of defense in depth. See our fail2ban setup guide if you want to add it.
If you want a safe place to practice this hardening process without risking a production server, our Budget VPS plans are an affordable sandbox to lock down, break, and start fresh as many times as you need.