Nginx is one of the most popular web servers in the world. Originally written to solve the "C10k problem" (handling 10,000 concurrent connections), it has grown into the default choice for high-performance websites. Whether you are serving static HTML files, running a Node.js API, or setting up a reverse proxy for a complex backend, Nginx is exactly what you need.
Installing Nginx on any Linux server running Ubuntu or Debian takes less than 15 minutes.
Step 1: Install Nginx
Because Nginx is available in the default Ubuntu and Debian repositories, it is straightforward to install using the apt package manager.
Before installing any new software, refresh your local package index:
sudo apt update
Now, install Nginx:
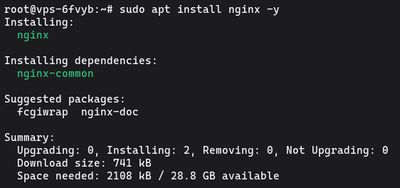
sudo apt install nginx -y
Ubuntu and Debian automatically start the Nginx service as soon as the installation finishes.
Step 2: Adjust the Firewall
If you have enabled the UFW firewall (as we highly recommend in our UFW Setup Guide), you need to allow connections to Nginx so the outside world can reach your websites.
During installation, Nginx registers itself with UFW to provide a few automatic application profiles. You can see them by typing:
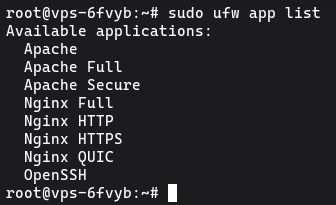
sudo ufw app list
You should see:
Available applications:
  Nginx Full
  Nginx HTTP
  Nginx HTTPS
  OpenSSH
- Nginx HTTP: Opens port 80 (normal, unencrypted web traffic).
- Nginx HTTPS: Opens port 443 (TLS/SSL encrypted traffic).
- Nginx Full: Opens both port 80 and 443.
For the vast majority of cases, you'll eventually want an SSL certificate, so it's best to allow both upfront:
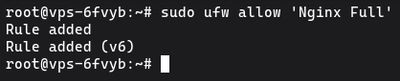
sudo ufw allow 'Nginx Full'
Verify that the change was successfully applied:
sudo ufw status
Step 3: Check your Web Server
At this point, your web server is fully operational. To verify this, open your favorite web browser and navigate to your server's public IP address.
If you don't know your server's public IP address, you can find it by running:

curl -4 icanhazip.com
Type that IP address into your browser: http://your_server_ip
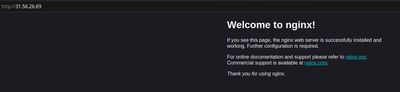
You should see the default "Welcome to nginx!" landing page. This confirms that the software is running correctly and that your firewall is allowing traffic.
Step 4: Manage the Nginx Process
Now that you have your web server up and running, you need to know how to manage it. You will use systemctl commands to control the Nginx service.
To stop your web server:

sudo systemctl stop nginx
To start the web server when it is stopped:

sudo systemctl start nginx
To stop and then completely restart the service:

sudo systemctl restart nginx
If you only made configuration changes (like adding a new domain), Nginx can reload without dropping active connections. This is the command you will use most often:

sudo systemctl reload nginx
Step 5: Set Up a Server Block (Virtual Host)
By default, Nginx on Ubuntu has one server block enabled that serves documents out of a directory at /var/www/html. While this works well for a single site, it becomes unmanageable if you are hosting multiple sites.
Instead of modifying the default setup, you should create a Server Block for your domain (in the Apache world, these are called Virtual Hosts).
For this example, we will use your_domain.com.
1. Create the directory for your domain

sudo mkdir -p /var/www/your_domain.com/html
2. Assign ownership of the directory
Assign ownership to your current non-root user (so you can easily upload files later):
sudo chown -R $USER:$USER /var/www/your_domain.com/html
3. Create a sample index.html page

nano /var/www/your_domain.com/html/index.html
Paste this simple HTML into the file:
<html>
    <head>
        <title>Welcome to your_domain.com!</title>
    </head>
    <body>
        <h1>Success! The your_domain.com server block is working!</h1>
    </body>
</html>
Save and close the file.
4. Create the Nginx server block configuration
Now we need to tell Nginx to serve that folder when someone visits your_domain.com. Create a new configuration file in the sites-available directory:

sudo nano /etc/nginx/sites-available/your_domain.com
Paste in the following configuration base:
server {
    listen 80;
    listen [::]:80;

    root /var/www/your_domain.com/html;
    index index.html index.htm index.nginx-debian.html;

    server_name your_domain.com www.your_domain.com;

    location / {
        try_files $uri $uri/ =404;
    }
}
Save and close the file.
5. Enable the file by linking it to sites-enabled
Nginx ignores files in sites-available unless they have a symbolic link placed into the sites-enabled directory. Create that link now:

sudo ln -s /etc/nginx/sites-available/your_domain.com /etc/nginx/sites-enabled/
6. Test your configuration and reload
Before restarting Nginx, always test your configuration to make sure there are no syntax errors:

sudo nginx -t
If the output says syntax is ok and test is successful, reload Nginx to apply the changes:
sudo systemctl reload nginx
Nginx should now be serving your domain name. Assuming you have updated your domain's DNS A-records to point to your VPS IP address, navigating to http://your_domain.com will show the success page you just created.
If you are looking for a highly reliable and blazing-fast environment to host your new Nginx server, spin up one of our Premium VPS instances and deploy your projects today.