Docker has fundamentally changed how applications are developed and deployed. Instead of wrestling with dependencies ("it works on my machine but not the server!"), Docker packages your application and everything it needs into an isolated, portable container that runs perfectly anywhere Docker is installed.
While Ubuntu and Debian include a version of Docker in their default apt repositories, it is almost always outdated. To get the latest features, security patches, and the integrated docker-compose-plugin, you need to install Docker Engine directly from Docker's official repository.
Step 1: Update System and Install Dependencies
Before adding a new external repository, update your package index and ensure you have the necessary base packages required over HTTPS.
sudo apt update
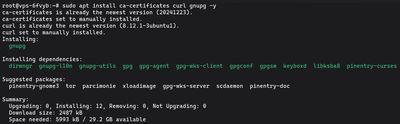
sudo apt install ca-certificates curl gnupg -y
Step 2: Add Docker's Official GPG Key
To ensure the software you are downloading hasn't been tampered with, apt uses GPG keys. You need to download Docker's official GPG key and store it properly in the new standardized /etc/apt/keyrings directory.
Create the directory (it may already exist):

sudo install -m 0755 -d /etc/apt/keyrings
Download and save the key:

curl -fsSL https://download.docker.com/linux/ubuntu/gpg | sudo gpg --dearmor -o /etc/apt/keyrings/docker.gpg
(If you are on Debian, change ubuntu in the URL to debian)
Finally, adjust the permissions so apt can read the key during updates:

sudo chmod a+r /etc/apt/keyrings/docker.gpg
Step 3: Set up the Docker Repository
Now that the system trusts incoming packages from Docker, you need to tell apt where to find them by adding the repository to your sources list.
Copy and paste this entire block of code into your terminal and press Enter. It automatically detects your system's architecture (like amd64 or arm64) and code name, and creates the file for you:

(For Ubuntu)
echo \
  "deb [arch="$(dpkg --print-architecture)" signed-by=/etc/apt/keyrings/docker.gpg] https://download.docker.com/linux/ubuntu \
  "$(. /etc/os-release && echo "$VERSION_CODENAME")" stable" | \
  sudo tee /etc/apt/sources.list.d/docker.list > /dev/null
(For Debian)
echo \
  "deb [arch="$(dpkg --print-architecture)" signed-by=/etc/apt/keyrings/docker.gpg] https://download.docker.com/linux/debian \
  "$(. /etc/os-release && echo "$VERSION_CODENAME")" stable" | \
  sudo tee /etc/apt/sources.list.d/docker.list > /dev/null
With the new repository added, update your package index one more time so apt sees the new Docker packages:
sudo apt update
Step 4: Install Docker Engine and Compose
Finally, you can install the latest stable version of Docker cleanly.
This command installs the core Docker engine (docker-ce), the command-line client (docker-ce-cli), the runtime (containerd.io), and crucial plugins like Docker Compose V2 (docker-compose-plugin).

sudo apt install docker-ce docker-ce-cli containerd.io docker-buildx-plugin docker-compose-plugin -y
The Docker daemon automatically starts running as soon as the installation finishes.
Step 5: Verify the Installation
To confirm that the entire engine is working, you can download and run Docker's official test image. It spins up a tiny container, prints a confirmation message to your terminal, and then shuts itself down.
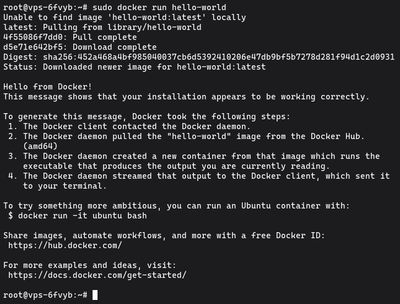
sudo docker run hello-world
If it succeeds, you'll see a lengthy validation message starting with:
"Hello from Docker! This message shows that your installation appears to be working correctly."
[!WARNING]
Docker and your Firewall (UFW): By default, Docker modifies your system'siptablesrules directly. This means Docker completely bypasses UFW rules. If you launch a container and map a port to the public internet (e.g.,-p 8080:80), that port will be open globally even if UFW is set to "deny". Always be cautious when exposing ports in production.
Step 6 (Optional): Run Docker Without Sudo
By default, the docker command can only be run by the root user or someone using sudo. This can be annoying if you are managing a lot of containers.
If you created your own non-root sudo-user (as recommended in our user guide), you can add that user to the docker group to bypass the sudo requirement.
sudo usermod -aG docker $USER
Warning: Being in the docker group effectively grants root-level privileges to the system. Only add users you completely trust.
For this group change to take effect, you must log out of your SSH session entirely and log back in, or run the following command to activate the group logic in your current shell:
su - $USER
Now, try running the test without sudo:
docker run hello-world
If it works, congratulations! Your VPS is fully equipped to deploy the infinite number of pre-packaged container apps available on Docker Hub natively and securely.
For a reliable environment supporting rapid project prototyping with Docker, checkout our high-performance line of affordable Budget VPS environments today.