
Apache is the legendary, battle-tested web server that helped build the internet. It remains one of the most widely used web servers globally, renowned for its power, reliability, and immense ecosystem of modules (like mod_rewrite used extensively by WordPress and other CMS platforms).
On Ubuntu and Debian systems, the Apache package and service are referred to as apache2. Setting it up takes only a few minutes. Here is how you do it.
Step 1: Install Apache
Apache is a core package available directly from the default Ubuntu and Debian software repositories, which means we can install it cleanly using the apt package manager.
As always before starting, update your local package index to ensure you get the latest version available:
sudo apt update
Install the apache2 package:

sudo apt install apache2 -y
Much like Nginx, the apt process automatically configures the Apache service so that it starts automatically immediately following the installation, and ensures it runs automatically when the server boots.
Step 2: Adjust the Firewall
Before testing Apache, you need to modify your firewall rules to allow outside access to the default web ports. If you followed our recommended UFW Firewall Config Guide, you'll use UFW to seamlessly handle this.
Apache registers a few application profiles with UFW upon installation. List them by typing:
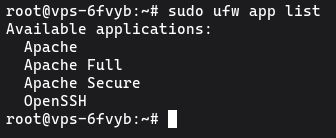
sudo ufw app list
You should see:
Available applications:
  Apache
  Apache Full
  Apache Secure
  OpenSSH
- Apache: Opens only port 80 (normal, unencrypted HTTP traffic).
- Apache Secure: Opens only port 443 (TLS/SSL encrypted HTTP traffic).
- Apache Full: Opens both port 80 and port 443.
We strongly recommend allowing both ports out of the gate so you are ready to configure SSL/TLS encryption (HTTPS) in the future.
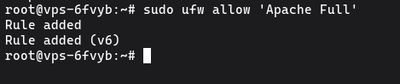
sudo ufw allow 'Apache Full'
Check the status to verify the change:
sudo ufw status
Step 3: Check your Web Server
At this point, Apache is running and your firewall is permitting traffic. Let's make sure things are working by requesting a page from Apache.
Point your favorite web browser at your server's public IP address. If you need to remind yourself of your server's IP quickly from the terminal:

curl -4 icanhazip.com
Enter this IP address into the URL bar of your browser:
http://your_server_ip
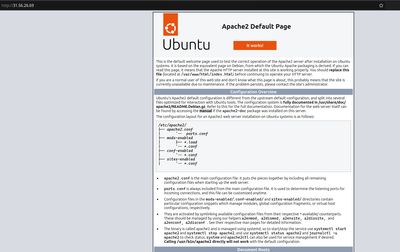
You should immediately see the default Ubuntu Apache2 Default Page (or the Debian equivalent). This page confirms that the web server software is installed properly and accessible over the internet securely.
Step 4: Manage the Apache Process
Managing Apache relies on systemd via the systemctl command. Here are the basic management commands you will need for daily web server administration over the apache2 service.
To stop the web server entirely:

sudo systemctl stop apache2
To start your web server when it is stopped:

sudo systemctl start apache2
To stop and start the service in a single command, use restart (useful if you heavily broke configuration dependencies):

sudo systemctl restart apache2
However, if you simply changed a configuration file or added a new Virtual Host, you can force Apache to reload its config without dropping the connections of anyone currently browsing the site:

sudo systemctl reload apache2
Step 5: Set Up Virtual Hosts
If you plan to host more than one website (domain name) on your server, you must configure Virtual Hosts (equivalent to Server Blocks in Nginx).
Apache provides a default virtual host configuration out of the box (000-default.conf) that serves documents from the /var/www/html directory. This is fine for a single site, but quickly becomes a nightmare if you want to host multiple distinct domains.
Instead of overriding the default site, we will create an entirely new directory structure and config file for your new domain. For this example, we will use your_domain.com.
1. Create the Directory
Create a dedicated folder for your domain inside /var/www/:

sudo mkdir -p /var/www/your_domain.com/html
2. Adjust Ownership
Give your user account ownership of the web root folder so that you can edit or upload files without needing root permissions continuously:

sudo chown -R $USER:$USER /var/www/your_domain.com/html
3. Create a Test Page
Put a sample file in place to ensure everything is wiring up correctly.

nano /var/www/your_domain.com/html/index.html
Add this sample HTML block:
<html>
    <head>
        <title>Welcome to your_domain.com!</title>
    </head>
    <body>
        <h1>Success! The your_domain.com virtual host is working!</h1>
    </body>
</html>
Save and exit.
4. Create the Virtual Host Configuration File
Apache on Ubuntu isolates configuration into cleanly organized folders. Virtual hosts should be defined in /etc/apache2/sites-available.

sudo nano /etc/apache2/sites-available/your_domain.com.conf
Paste the following foundational configuration into the file, which tells Apache what domain to listen for and where to find the source files:
<VirtualHost *:80>
    ServerAdmin webmaster@localhost
    ServerName your_domain.com
    ServerAlias www.your_domain.com
    DocumentRoot /var/www/your_domain.com/html
    ErrorLog ${APACHE_LOG_DIR}/error.log
    CustomLog ${APACHE_LOG_DIR}/access.log combined
</VirtualHost>
Save and close the file.
5. Enable the Virtual Host
Apache includes built-in tools for easily managing configurations. We'll use the a2ensite (Apache 2 Enable Site) tool to explicitly enable your new virtual host:
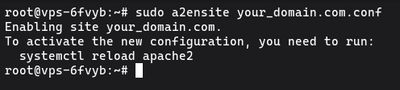
sudo a2ensite your_domain.com.conf
While we're at it, let's disable the default landing page that comes with Apache (so requests meant for our domain don't confusingly get mapped back to the default fallback):
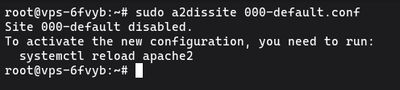
sudo a2dissite 000-default.conf
6. Test configuration and restart
Any time you edit Apache's configuration files, it is best practice to test them for syntax errors before a full restart. This ensures you don't accidentally shut your web server down due to a typo.
sudo apache2ctl configtest
You should see an output that says Syntax OK. (A harmless server 'Could not reliably determine the server's fully qualified domain name' warning may appear, but the syntax validation is the key here).
Now, reload Apache to initialize the new virtual host:
sudo systemctl reload apache2
Apache should now be actively serving your domain name. So long as your DNS records for your_domain.com are pointed to your VPS IP address, you can type it into your browser to see your success string.
For a reliable environment supporting rapid project prototyping with Apache web layers, checkout our high-performance line of affordable Budget VPS environments today.