By default, when you start a service on a Linux server, it binds to a port and starts listening to the internet. If you install a database and don't explicitly configure it to bind only to localhost, it's suddenly exposed to the public internet.
A firewall changes this from a "default allow" model to a "default deny" model. A firewall drops all incoming traffic except for the specific ports you explicitly open.
On Ubuntu and Debian, the standard tool for managing the firewall is UFW (Uncomplicated Firewall). It's a user-friendly frontend for iptables that turns complex networking commands into simple English.
Step 1: Install UFW (If Necessary)
Check if it's there:

sudo ufw status
If it says "Status: inactive", it's installed but off. If it says "command not found", install it:
sudo apt update
sudo apt install ufw -y
Step 2: Set Default Policies
Before we start opening ports, we need to establish the baseline rules. The most secure baseline is to block everything coming in, and allow everything going out.
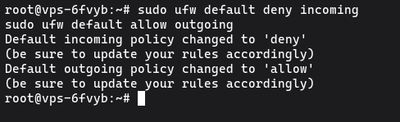
sudo ufw default deny incoming
sudo ufw default allow outgoing
Once UFW is enabled, these commands ensure that nobody can connect to your server unless you explicitly open a hole for them, while your server can still reach out to download updates and send emails.
Step 3: Allow SSH (CRUCIAL)
Do not turn on the firewall yet. Since the default incoming policy is "deny", enabling UFW right now would immediately drop your SSH connection and lock you out of your server.
You must explicitly allow SSH traffic first.
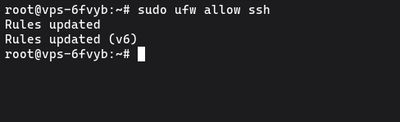
sudo ufw allow ssh
This opens port 22. If you followed our guide to secure SSH and change the default port, you need to specify the exact port and protocol (e.g., if you changed it to 2222):
sudo ufw allow 2222/tcp
Step 4: Allow Other Necessary Services
Now open the ports for whatever else your server is hosting. Most services have names UFW recognizes, but you can always use the port numbers directly.
For a web server (HTTP / HTTPS):
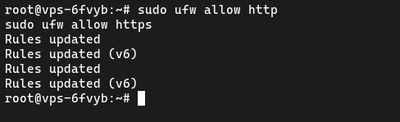
sudo ufw allow http
sudo ufw allow https
(Which translates to ports 80 and 443).
For a custom app running on port 8080:
sudo ufw allow 8080/tcp
Allowing Specific IP Addresses
If you have a database (like MySQL on port 3306) that you want to access from your home IP or another server, but not the whole internet, you can allow a single IP:
sudo ufw allow from 203.0.113.50 to any port 3306
Step 5: Enable UFW
With your SSH port safely allowed, it's time to turn the firewall on:

sudo ufw enable
You'll see a warning: Command may disrupt existing ssh connections. Proceed with operation (y|n)?. Type y and press Enter.
Because you opened the SSH port in Step 3, your connection will stay alive. Check the status to see your active rules:
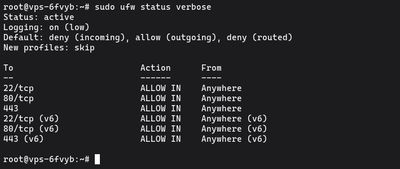
sudo ufw status verbose
How to Delete Rules
If you make a mistake or no longer need a port open, you can delete a rule. The easiest way is to view the rules as a numbered list:
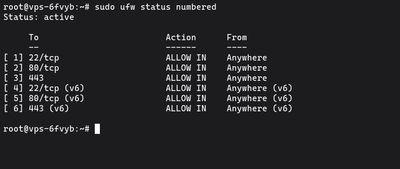
sudo ufw status numbered
Find the number next to the rule you want to remove, and delete it:
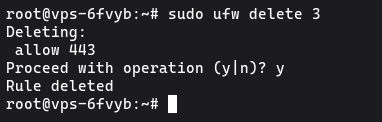
sudo ufw delete 3
UFW will ask for confirmation, and then the rule will be gone. Note that deleting line 3 will shift the numbers below it up, so always run status numbered anew before deleting the next rule.
Going Further
UFW is perfect for 99% of typical server setups. It cleanly handles dropping malicious background noise while exposing exactly what you intend to expose. If you pair it with fail2ban, your server will not only drop unwanted traffic, but actively ban IPs that try to abuse your open ports.
If you don't have a server to practice on, our Budget VPS is the perfect, low-cost environment to spin up, configure a firewall, break things, and start completely fresh without any headaches.